Thursday, October 13, 2011

WinToFlash you can install Windows XP/2003/Vista/2008/7 from USB Flashdrive easily.

WinToFlash Step by step Guide Install Windows XP from USB Flash drive:

Requirements:
-USB Flash disk/Flash drive/Pen drive/Thumb drive, etc
-Computer with CD/DVD drive to build this Windows XP setup Flashdisk (or you may use computer without CD/DVD drive, but you have to copy Windows XP setup files from another computer to your hard disk)
-Computer with or without CD/DVD drive (e.g. Aspire One)

Step 1:
Download WinToFlash here http://wintoflash.com/download/en/
from the Author: This software may contain bugs (spelling too).

so if you find any spelling error please write a comment and correct it
or report to support@novicorp.com
don't forget to write your WinToFlash version.

Step 2:
Extract the zip file, then double click on WinToFlash.exe


Step 3:
Click Accept button...

Step 4:

This program will transfer Windows setup from CD or DVD to flash drive Recommended to switch on Wizard mode for users have no experience of Windows setup fine tuning Windows setup transfer wizard Following basic instructions you will transfer Windows setup program to flash drive and install Windows on PC have no CD or DVD drive
Click the button to enter Wizard mode...


Step 5:
This program will help you to install Windows from a flash
To access other features and advanced options swicth to advanced mode (for advanced users).
for now, we will use wizard mode instead of advanced mode, so click Next...


step 6:

Specify locations of files and drive
on Windows files path click Select button


Step 7:
Select CD/DVD drive that contain Windows XP CD or folder that contain Windows XP files... then click OK


step 8:
Specify locations of files and drive
on USB drive click Select button

Step 9:
Select USB Flash drive ... then click OK

Step 10:
Specify locations of files and drive
Click Next button...


Step 11:
Select "I Accepted the terms of the license agreement" then click Continue...


Step 12:

Warning! Formatting will erase ALL DATA on target disk. To format press OK, to quit press Cancel

Click OK...
Step 13:
Please wait while WinToFlash transferring Windows setup to flash drive


Step 14:
Finished... click Next then Exit
USB Flash drive ready...


On computer without CD/DVD drive (e.g. Aspire One)
you must change the first boot order to USB Flash drive from BIOS. How to do this?

Change Boot order from BIOS:
This is just for example (Aspire 4710)
your BIOS interface may be slightly different

Step 1:
Plug a Flash drive into a USB port on your computer/laptop

Step 2:
Turn on your laptop then hit F2 rapidly (or Del for some other machine)
then go to Boot tab > change boot order > then hit F10 key to Save and Exit


Now you can boot from USB Flash drive, first select

1st, text mode setup (Boot from flash again after finished)
then... on the first restart, select
2nd, GUI mode setup, continue setup + 1st start of Windows
Install Windows XP as usual...


Good luck...
please let me know if you find a problem...

Microsoft .NET Framework 2.0 setup error on Windows XP SP3

I tried to install Microsoft .NET Framework 2.0 because Encarta 2008 need it, but there is an error when install...

Error 25007.Error occured while initializing fusion. Setup could not load fusion with LoadLibraryShim(). Error: 0x80131702

Microsoft .NET Framework 2.0 setup error
Windows XP SP3 is not listed in the Microsoft .NET Framework 2.0 "system requirements" but why :( ? (maybe future release of Microsoft .NET Framework 2.0 will solve this problem). until now I was unable to use encarta on my Windows XP SP3. I'm just use encarta on my windows Vista, because I make Dual boot on my laptop.

Windows XP SP3 - systeminfo
UPDATE :

PROBLEM SOLVED !!!
Delete WINDOWS\WinSxS\Policies

Realtek (WLAN) IEEE 802.11a/b/g Windows 2000/XP/Vista/7/-MacOS-Linux Drivers

realtek Realtek (WLAN) IEEE 802.11a/b/g Windows 2000/XP/Vista/7/ MacOS Linux Drivers
Download Realtek RTL8185L, RTL8187L, RTL8187B IEEE 802.11a/b/g Wireless LAN (WLAN) drivers for Windows 2000/XP/Vista/7 (x64 and x86), MacOS and Linux:


RTL8185L


Windows Vista(32bit/64bit) Driver Only Ver.1122

Realtek RTL8185L (WLAN) IEEE 802.11a/b/g Driver
(Download)


Windows XP(32bit/64bit)/2K Driver Only Ver.1114

Realtek RTL8185L (WLAN) IEEE 802.11a/b/g Driver
(Download)


UI Package and Driver (support WinXP/Vista) Ver.1113

Realtek RTL8185L (WLAN) IEEE 802.11a/b/g Driver
(Download)


UI Package and Driver (Support XP/Vista/Win7) Ver.1122

Realtek RTL8185L (WLAN) IEEE 802.11a/b/g Driver
(Download)


Linux driver for kernel 2.6.X Ver. 1031

Realtek RTL8185L (WLAN) IEEE 802.11a/b/g Driver
(Download)


MAC OSX 10.3 Driver package (UI ver. 1.4.2 ) Ver.1.4.0

Realtek RTL8185L (WLAN) IEEE 802.11a/b/g Driver
(Download)


MAC OSX 10.4 Driver package (UI ver. 1.4.2 ) Ver.1.4.0

Realtek RTL8185L (WLAN) IEEE 802.11a/b/g Driver
(Download)


RTL8187L


UI and Driver auto installation package(support XP/Vista/Win7)(Beta) Ver.1316(Beta)

Realtek RTL8187L (WLAN) IEEE 802.11a/b/g Driver
(Download)


Windows7 InstallPackage (Beta) Ver.1316(Beta)

Realtek RTL8187L (WLAN) IEEE 802.11a/b/g Driver
(Download)


UI Package and driver (support WinXP/Vista) Ver.1313

Realtek RTL8187L (WLAN) IEEE 802.11a/b/g Driver
(Download)


Linux driver for kernel 2.6.X Ver.1040

Realtek RTL8187L (WLAN) IEEE 802.11a/b/g Driver
(Download)


MAC OSX 10.4 Driver Package (UI ver. 1.5.7) Ver.1315

Realtek RTL8187L (WLAN) IEEE 802.11a/b/g Driver
(Download)


MAC OSX 10.5 Driver Package (UI ver. 1.5.7) Ver.1315

Realtek RTL8187L (WLAN) IEEE 802.11a/b/g Driver
(Download)


RTL8187B


UI and Driver auto install package(Support XP/Vista/Vin7)(Beta) Ver.1182(Beta)

Realtek RTL8187B (WLAN) IEEE 802.11a/b/g Driver
(Download)


UI and Driver auto install package(Support XP/Vista/Win7) Ver.1181

Realtek RTL8187B (WLAN) IEEE 802.11a/b/g Driver
(Download)


MAC OSX 10.4 Install Package(UI ver.1.5.7) Ver.1148

Realtek RTL8187B (WLAN) IEEE 802.11a/b/g Driver
(Download)


MAC OSX 10.5 Install Package(UI ver. 1.5.7) Ver.1148

Realtek RTL8187B (WLAN) IEEE 802.11a/b/g Driver
(Download)

Download Windows 7 x64 Drivers for Acer Aspire 5750 and Aspire 5750G

Acer Aspire 5750 Series Acer Aspire 5750 5750G Windows 7 Drivers (x64)


Download Windows 7 x64 Drivers for Acer Aspire 5750 and Aspire 5750G:

x64=64bit


Intel Chipset Driver 9.2.0.1015 2.5 MB

Acer Aspire 5750-5750G Windows 7 Driver (x64)
(Download)


Huawei 3G Module Driver 3.17.00.00 2.4 MB

Acer Aspire 5750-5750G Windows 7 Driver (x64)
(Download)


Intel SATA AHCI Driver 10.1.5.1001 10.8 MB

Acer Aspire 5750-5750G Windows 7 Driver (x64)
(Download)


Realtek Audio Driver 6.0.1.6339 146.5 MB

Acer Aspire 5750-5750G Windows 7 Driver (x64)
(Download)


Atheros Bluetooth Driver for Windows 7 SP1 6.18.0624.0302 100.0 MB

Acer Aspire 5750-5750G Windows 7 Driver (x64)
(Download)


Atheros Bluetooth Driver (3.0) 6.18.0624.0302 63.6 MB

Acer Aspire 5750-5750G Windows 7 Driver (x64)
(Download)


Atheros Bluetooth Driver 6.33.1123.0302 110.4 MB

Acer Aspire 5750-5750G Windows 7 Driver (x64)
(Download)


Broadcom Bluetooth Driver 6.3.0.7300 59.2 MB

Acer Aspire 5750-5750G Windows 7 Driver (x64)
(Download)


Broadcom Card Reader Driver 14.6.1.2 15.1 MB

*(Fixes Sony memory card compatibility issue)
Acer Aspire 5750-5750G Windows 7 Driver (x64)
(Download)


Broadcom Card Reader Driver 1.0.0.218 15.0 MB

Acer Aspire 5750-5750G Windows 7 Driver (x64)
(Download)


Broadcom LAN Driver 14.4.2.2 10.5 MB

Acer Aspire 5750-5750G Windows 7 Driver (x64)
(Download)


ELANTECH Touchpad Driver 8.0.6.0 61.0 MB

Acer Aspire 5750-5750G Windows 7 Driver (x64)
(Download)


Synaptics Touchpad Driver 15.1.6.0 32.7 MB

Acer Aspire 5750-5750G Windows 7 Driver (x64)
(Download)


Intel Turbo Boost Driver 7.0.0.1144 4.0 MB

Acer Aspire 5750-5750G Windows 7 Driver (x64)
(Download)


NEC USB Driver (3.0) 2.0.26.0 6.8 MB

Acer Aspire 5750-5750G Windows 7 Driver (x64)
(Download)


AMD VGA Driver 8.861.0.0 294.5 MB

Acer Aspire 5750-5750G Windows 7 Driver (x64)
(Download)


Intel VGA Driver 8.15.10.2418 152.4 MB

Acer Aspire 5750-5750G Windows 7 Driver (x64)
(Download)


NVIDIA VGA Driver 8.17.12.6800 262.6 MB

Acer Aspire 5750-5750G Windows 7 Driver (x64)
(Download)


Intel WiMax Driver 5.30.1005.3 30.4 MB

Acer Aspire 5750-5750G Windows 7 Driver (x64)
(Download)


Atheros Wireless LAN Driver (HB95/HB97) 9.1.0.334 43.7 MB

Acer Aspire 5750-5750G Windows 7 Driver (x64)
(Download)


Broadcom Wireless LAN Driver 5.100.235.19 31.7 MB

Acer Aspire 5750-5750G Windows 7 Driver (x64)
(Download)


Intel Wireless LAN Driver 14.0.1.2 206.3 MB

Acer Aspire 5750-5750G Windows 7 Driver (x64)
(Download)

WinToFlash Guide - Install Windows XP from USB Flash drive

With the help of WinToFlash you can install Windows XP/2003/Vista/2008/7 from USB Flash drive easily.


WinToFlash Step by step Guide Install Windows XP from USB Flash drive:

Requirements:
-USB Flash disk/Flash drive/Pen drive/Thumb drive, etc
-Computer with CD/DVD drive to build this Windows XP setup Flashdisk (or you may use computer without CD/DVD drive, but you have to copy Windows XP setup files from another computer to your hard disk)
-Computer with or without CD/DVD drive (e.g. Aspire One)

Step 1:
Download WinToFlash here http://wintoflash.com/download/en/
from the Author: This software may contain bugs (spelling too).

so if you find any spelling error please write a comment and correct it
or report to support@novicorp.com
don't forget to write your WinToFlash version.

Step 2:
Extract the zip file, then double click on WinToFlash.exe


Step 3:
Click Accept button...

Step 4:

This program will transfer Windows setup from CD or DVD to flash drive Recommended to switch on Wizard mode for users have no experience of Windows setup fine tuning Windows setup transfer wizard Following basic instructions you will transfer Windows setup program to flash drive and install Windows on PC have no CD or DVD drive
Click the button to enter Wizard mode...


Step 5:
This program will help you to install Windows from a flash
To access other features and advanced options swicth to advanced mode (for advanced users).
for now, we will use wizard mode instead of advanced mode, so click Next...


step 6:
Specify locations of files and drive
on Windows files path click Select button


Step 7:
Select CD/DVD drive that contain Windows XP CD or folder that contain Windows XP files... then click OK


step 8:
Specify locations of files and drive
on USB drive click Select button

Step 9:
Select USB Flash drive ... then click OK

Step 10:
Specify locations of files and drive
Click Next button...


Step 11:
Select "I Accepted the terms of the license agreement" then click Continue...


Step 12:
Warning! Formatting will erase ALL DATA on target disk. To format press OK, to quit press Cancel

Click OK...
Step 13:
Please wait while WinToFlash transferring Windows setup to flash drive


Step 14:
Finished... click Next then Exit
USB Flash drive ready...


On computer without CD/DVD drive (e.g. Aspire One)
you must change the first boot order to USB Flash drive from BIOS. How to do this?

Change Boot order from BIOS:
This is just for example (Aspire 4710)
your BIOS interface may be slightly different

Step 1:
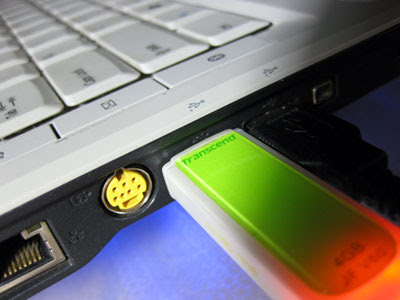
Plug a Flash drive into a USB port on your computer/laptop
Step 2:
Turn on your laptop then hit F2 rapidly (or Del for some other machine)
then go to Boot tab > change boot order > then hit F10 key to Save and Exit


Now you can boot from USB Flash drive, first select
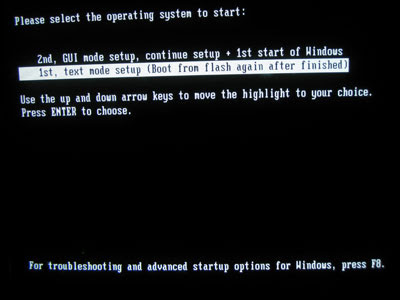
1st, text mode setup (Boot from flash again after finished)
then... on the first restart, select
2nd, GUI mode setup, continue setup + 1st start of Windows
Install Windows XP as usual...


Good luck...
please let me know if you find a problem...

Friday, September 30, 2011

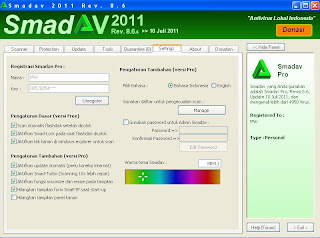
Download Smadav Pro 2011 Rev. 8.6 | Free Key | Serial Number


Smadav 2011 Rev. 8 was released with many new features and improvements that are specific to local eradication of the virus. Features such as Smad-Behavior that can identify new local virus that does not exist in the database SmadAV of his behavior when infecting the system. Smad-Ray that can scan automatically flash when installed within a maximum of 5 seconds.

SmadAV 2011 is more stable and highly recommended to be combined with international anti-virus because it can only handle local virus. Immunization flash (using autorun.inf folder) has been revised and previously will be no confirmation so you can decide whether a flashdisk is protected or not.

SmadAV 8.6 Pro. here present to complete the smadav free version 8.6. For those of you who want to taste the reliability smadav pro 8.6 please follow these steps!

Previously, I encourage you to continue making donations to SMADAV, in order to become a better antivirus. I give this key only for personal interest. NOT to be traded!.

Download Smadav 8.6 in smadav.net then install or please Click Here

When you fill the key make sure the internet is not connected. If you get blacklisted, fill in the name column: anti-bajakan key: (empty)


for "Personal"
Nama : MW
Key : 085200547400

for "Warnet"
Nama : MW
Key : 775277547400

for "Perusahaan"
Nama : MW
Key : 995299547400

then press register smadav will then be automatically changed to pro, don't forget to give any comment here and good luck!

Thursday, September 29, 2011

Create Ghost Bootup with Network

This trick shows you how create Symantec Ghost bootup floppy disks with Network option. With the network option, you can access the network resources and use the GhostCast feature to perform backup/restore via the network. The instructions based on Ghost 8, but similar procedures can be done on different versions of Ghost.
If you're looking for the instructions how to create a standard Symantec Ghost Bootup (i.e. without Network),

Or if you're looking for the instructions how to create a Ghost Bootup CD from the two floppy disks, 

Use this trick at your own risk.

Here's how

  1. Open the "Symantec Ghost Boot Wizard".
  2. Select "Network Boot Disk" and click "Next".
  3. At the screen "Symantec Ghost Boot Wizard - Network Interface Card", select an appropriate driver for your network card. If you need more details on a driver, click on it and select "Modify".
    If you don't see your network card listed, follow the next step to add a new one; otherwise, select your network card and click "Next" (and skip to step 9).


  4. To add a new driver, search and download your driver from the internet. Make sure you download a "DOS" driver. A "Packet Driver" usually comes with a ".COM" file or ".EXE" file. A "NDIS2 driver" usually comes with a ".DOS" file.
  5. Click "Add" on the screen "Symantec Ghost Boot Wizard - Network Interface Card" to bring up the "Template Type" dialog.

    Select "NDIS2 driver" or "Packet Driver" depending on what you have. (You probably have more luck searching a "NDIS2 driver" - file with ".DOS") then click "OK".
  6. At the screen "Template Properties", click on the "Browse..." button and browse to your driver. Then enter a name for "Driver Name". A driver name should be very simple and must end with a "$". For example, you can take the first few letter of your driver file and add the "$":
  7. Click "OK" to go back to the screen "Symantec Ghost Boot Wizard - Network Interface Card"
  8. The "Name" field of the new driver should be editable. Go ahead to change this name the way you want. This name is just to help you recognize it from the list. Then click "Next".
  9. Click "Next" on the next screen to "Use PC-DOS".
  10. On the next screen, you'll need to specify where the file "ghost.exe" is located. This file is normally installed to a path as example below, but you should double check. Then click "Next".
  11. Click "Next" on the next screen to use default options for external storage devices.
  12. On the next screen, you'll need to specify the Tcp/ip options. The Tcp/ip can be either "Automatic IP" (or "DHCP"), or "Static IP".
    If you plan to run Ghost on multiples computer on a same network at a same time (using GhostCast), you should specify a static IP for each CD to avoid conflicting. Otherwise, you can always select "DHCP will assign the IP settings". Then click "Next".
    <><>


  13. Click "Next" on the next screen:
  14. Click "Next" on the Review screen:
  15. A message will display telling you that you will need two floppy disks. Click "OK".
  16. The Boot Disk Wizard will start to erase your floppy and create the boot data. Once it's done with the first disk, it will prompt for a second one.